We love coffee and consider it an essential part of the wild camping experience. I’d love to say that all my camping coffee moments are idyllic—perched on a log in the morning sun, sipping coffee while soaking in the beauty of the wilderness (as if!). In truth, many of these moments involve being huddled in a tent, seeking shelter from the wind and rain. It’s often in these less-than-perfect conditions that the comfort of good coffee becomes most important. No matter the setting, though, the coffee still has to taste great.
The best way to make coffee while wild camping or backpacking depends largely on your priorities around pack size and weight—and how willing you are to balance that with great coffee flavor. Here’s a rundown of some of the best methods, from ultralight options to more gourmet brewing setups, along with their pros and cons.
My go-to methods? The V60 pour-over if I don’t mind the bulk, or the Jetboil cafetière attachment for a lighter, more compact setup. And if you’re wondering what to drink, check out my pal Donovan’s amazing coffee at Lighbulb Coffee, or have a peak at my list of Scotland Coffee Roasters if you want to try something from the north.
FYI: This post contains some affiliate links, so if you purchase something after clicking on the link, I might make a small kickback. Thanks for supporting the adventure!
8 different Ways to Make Camping Coffee
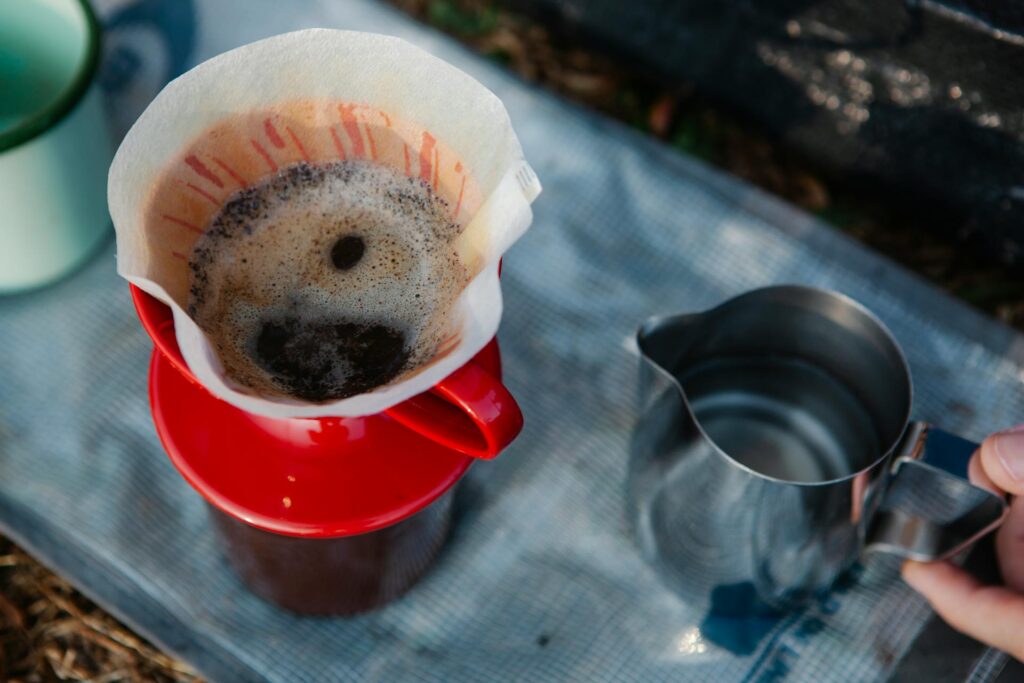
V60 Pour Over
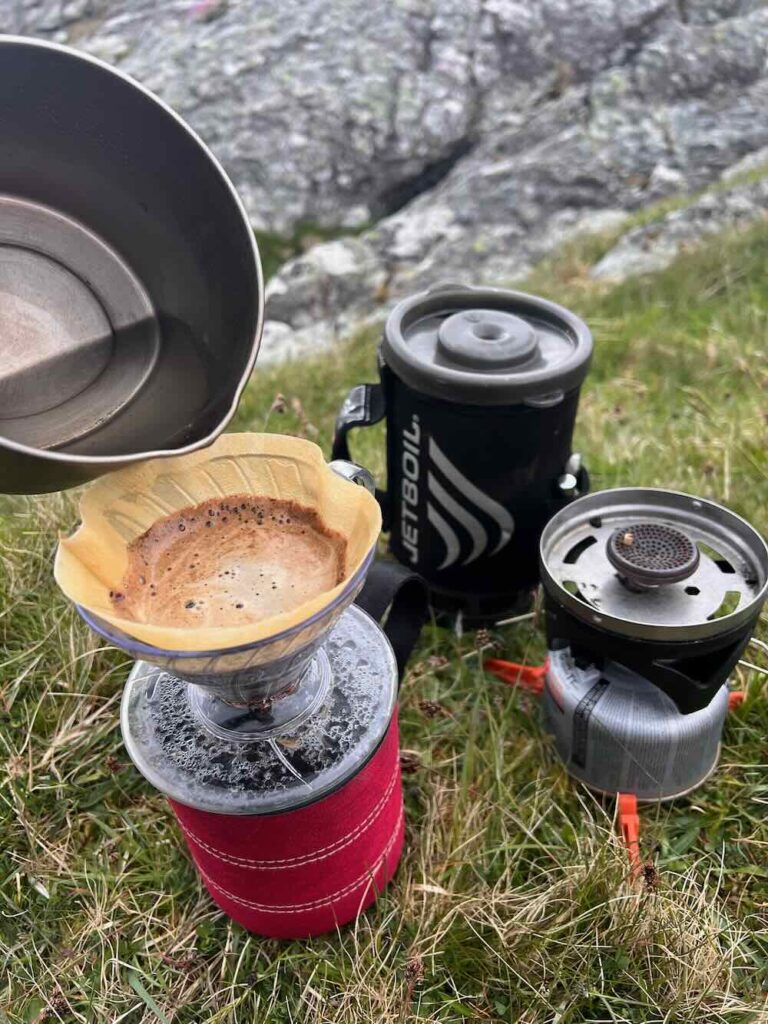
For me, the V60 makes the best-tasting coffee outdoors: bright, clean, and complex. The cone and filters hardly weigh a thing, but to do it properly you need a pot that pours in a steady, controlled stream. My MSR Titan Kettle works well, but it adds bulk (though you could use it as a spare bowl or to cook with).
- Weight: ~60g (cone + filters)
- Cost: ~£9 for a Hario plastic 400ml V60 + cost of filters
- Pros: Lightweight, produces clean, smooth coffee, biodegradable and reusable V60 filters are available.
- Cons: Bulky; requires a stable surface and careful pouring, which may be tricky outdoors.
- Best For: Coffee aficionados willing to carry a bit more gear for better flavor.
GSI Java Drip (and other One Cup Camping Coffee Makers)
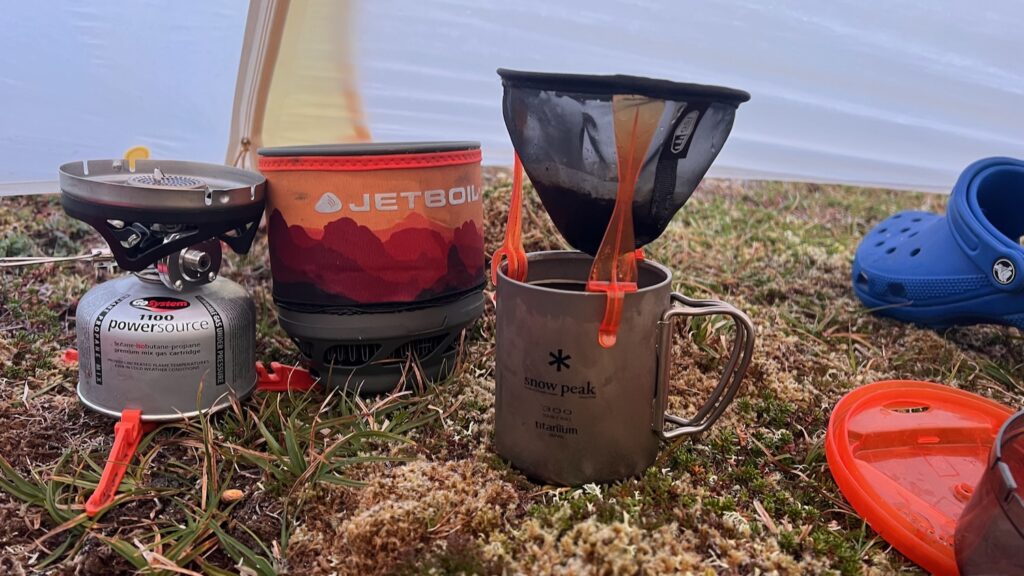
The GSI Java Drip is an uber light alternative to a V60. I bought one of these recently on a whim. It’s featherlight, folds flat, and doesn’t require paper filters. It also stows nicely in my Jetboil Minimo which I like. But the mesh doesn’t seem fine enough for me, which means the water goes through too fast – this could be a failing on the Minimo which has zero pouring ability. In the end, a sort of clunkier version of V60, and just OK coffee.
- Weight: 11g
- Cost: ~15
- Pros: Ultralight, compact, reusable mesh filter = no waste.
- Cons: Average flavor, sediment in the cup.
- Best For: Minimalists who want something better than instant without carrying much.
You can find even more ultralight coffee drippers like the Java Drip over at Ultralight Outdoor Gear. Snowpeak’s Collapsible Titanium Coffee Dripper has always looked elegant to me, but I can’t quite justify the price tag! If you get a chance to test any of these other camping coffee drippers out, I’d love to hear how it went!
AeroPress
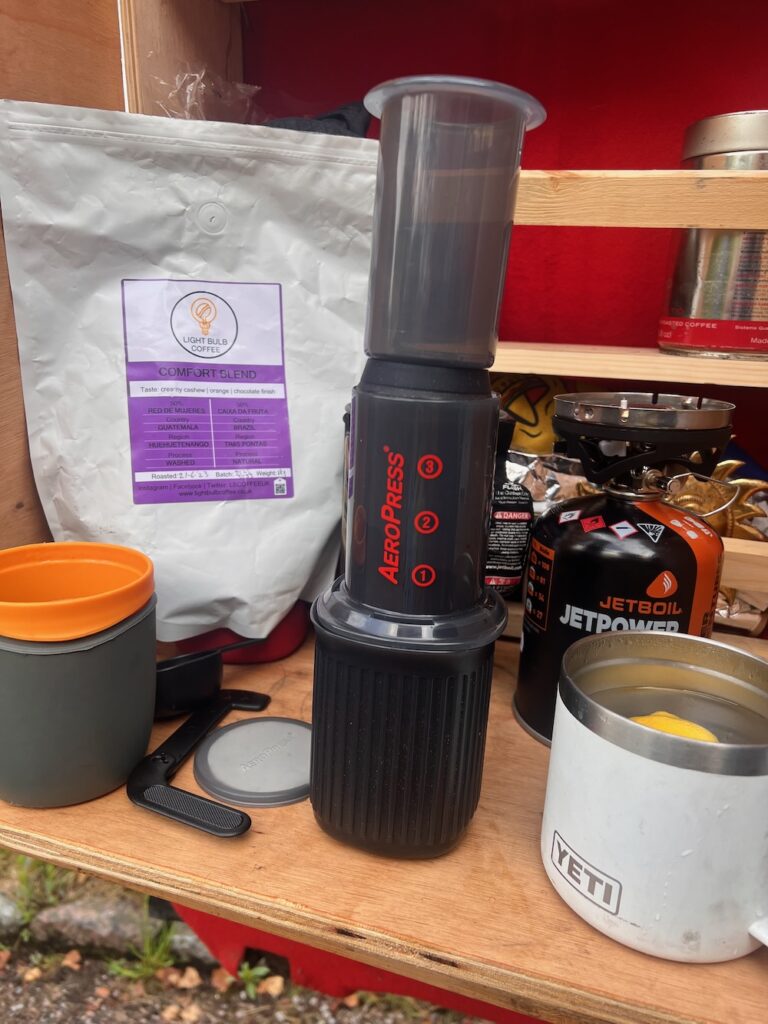
I own an Aeropress Go, a slightly more compact version of the usual Aeropress. I’ve used it in the van and have taken on non-backpacking trips, but haven’t yet taken it into the wild as it’s bulkier than my usual kit. That said, I know people who swear by the Aeropress for great coffee outdoors. It’s versatile, tough, and can produce something close to espresso. With a reusable metal filter it’s also quite sustainable.
- Weight: ~200g + filters
- Cost: £35-40
- Pros: Rich, clean flavor; versatile brewing styles; robust.
- Cons: Heavier than other methods; needs filters; messy cleanup.
- Best For: Campers who value café-quality coffee and can justify the extra grams.
French Press with the Jetboil Flash Attachment
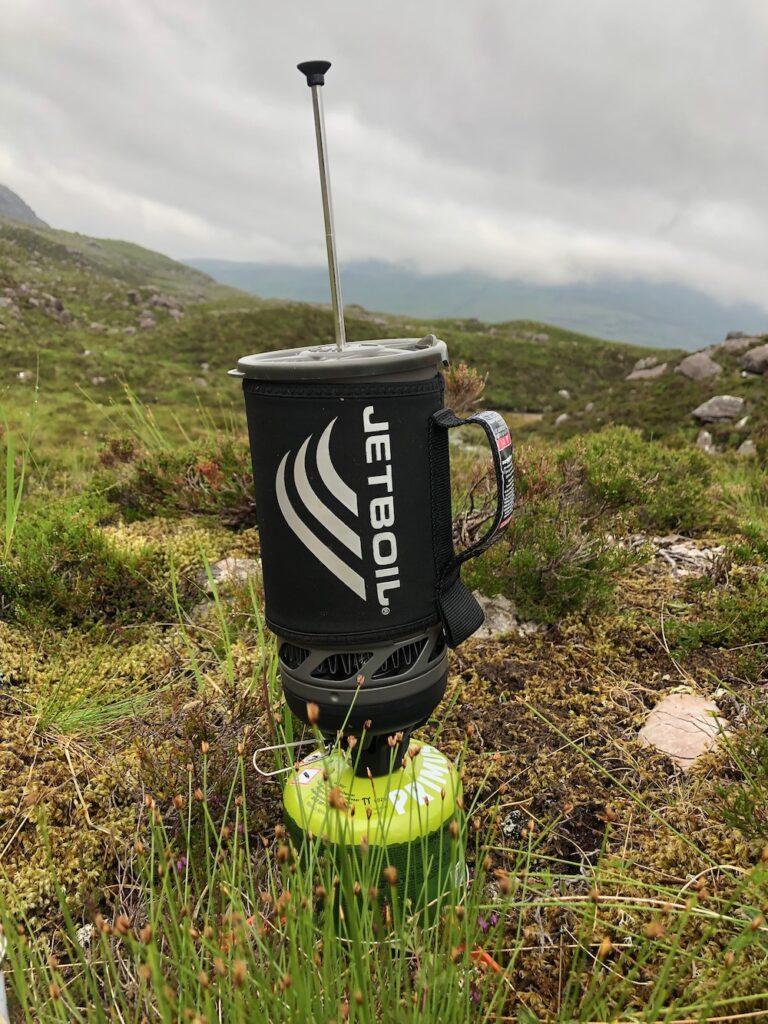
A classic French press is far too heavy for backpacking, but the Jetboil press gadget is a revelation. It weighs almost nothing, slots into the lid, and produces a full-bodied, satisfying brew. If you already use a Jetboil Flash, this is hard to beat.
- Weight: ~30g (Jetboil insert)
- Cost: £20 for the French Press or get the Jetboil Java Kit for a whopping near £200!
- Pros: Excellent flavor and body, light if you already carry a Jetboil, no filters required.
- Cons: Dependent on Jetboil system; cleanup can be messy.
- Best For: Jetboil owners who want great coffee without extra gear.
Cowboy Coffee
The original backcountry brew: toss grounds into boiling water, let them sink, and drink. No gear, no waste. Cowboy coffee can taste disgusting. But there are hacks for a better cowboy brew – read these tips from driftaway.coffee.
- Weight: 0g (just grounds)
- Cost: Zero (just the mug)
- Pros: Zero gear, zero waste, works anywhere.
- Cons: Murky, often bitter, can be sediment-heavy if you don’t make it properly.
- Best For: Emergencies or those who enjoy the rugged ritual.
Coffee Brew Bags / Single-Serve Pour-Over Packets
]These work like tea bags. They’re quick, tidy, and increasingly good (I was recently impressed by a sampler of Taylor’s Lazy Sunday brew bags). My issue is that most come wrapped in single-use plastic, which makes it impossible for me to embrace bew bags fully. Top tip: if you did want to go this route, you can buy compostable filter bags which means you can choose your own coffee, keep it convenient, and do your bit for nature, without which this entire post would be pointless.
- Weight: ~10g per bag
- Cost: Varies depending on roaster. By example, 80 Taylors coffee bags cost about £20.
- Pros: Lightweight, zero gear, no cleanup.
- Cons: Single-use packaging, limited flavor compared to pour-over or press.
- Best For: Convenience seekers who care about flavour but don’t want the fuss or the weight of a coffee making contraption.
Instant Coffee
Instant is the gram-counters’ dream. A few sachets in the rucksack and you’re sorted for the week. Quality has improved in recent years—some are actually pretty decent I hear—but IMHO it still doesn’t compare to a fresh brew. Unlike brew bags, you can avoid single use packaging buy purchasing in bulk. But like brew bags, you miss out on the ritual of actually making the coffee (and if that’s not your thing, that’s OK!).
- Weight: 5–10g per sachet
- Pros: Ultralight, zero faff, no additional equipment needed, just add hot water.
- Cons: Significantly lower flavour quality compared to fresh brews; can sometimes use single use plastic unless you buy in bulk.
- Best For: Ultralight backpackers or minimalist campers where every gram matters; or anyone not fussed about what their coffee tastes like.
Instat coffee tip: I’ve heard several people vouch for Starbucks Via instant so if you really want to go super minimal, start with that.
Moka Pot (Stovetop Espresso)

The moka pot has a long pedigree as the classic Italian stovetop espresso maker, and some outdoor folks swear by bringing one along. It makes a strong, rich brew with lots of body and punch. But they’re bulky, heavy, and not exactly designed for ultralight travel. A small aluminium pot (like the super cute Bialetti 1 Cup Moka Pot, weighing 300g) is the most realistic option for backpacking.
- Weight: ~250–400g depending on size
- Cost: £25+
- Pros: Produces strong, espresso-like coffee; robust and simple design; no filters needed.
- Cons: Bulky, heavier than most other options; fiddly to clean; not ideal for fast-and-light trips.
- Best For: Car camping, basecamps, or short overnights when you want a bold Italian-style brew.
Summary: Camping Coffee Makers Methods Compared
| Method | Flavor | Weight (approx) | Sustainability | Ease of Cleanup |
|---|---|---|---|---|
| Instant | Low–Medium | 5–10g per sachet | Low (plastic sachets) | Very easy |
| V60 Pour-Over | High | 60g + filters | Good (biodegradable filters) | Moderate |
| AeroPress | High | 200g + filters | Good (reusable filters) | Moderate |
| GSI Java Drip | Medium | 11g | Excellent (reusable mesh) | Easy |
| Coffee Brew Bags | Medium | 10g per bag | Variable (often plastic) | Very easy |
| Cowboy Coffee | Low–Medium | 0g (just grounds) | Excellent (no waste) | Easy (except grit) |
| French Press (Jetboil) | High | 30g (insert) | Good (reusable) | Moderate |
| Moka Pot | High | 250-400g | Excellent (no waste) | Moderate-hard |
Bonus Extras: Hand Grinders for Freshly Ground Camping Coffee
Grinding beans on the hill is a joy in itself—the smell alone can lift spirits on a cold morning. It’s also the single biggest thing you can do to improve flavour outdoors. There are a few ways to approach it, depending on how much weight you’re willing to carry.
Hand Grinder (Classic Barista Mode)

I use a Comandante C40 at home and in the van. It’s an absolute beast: smooth, consistent grind, built like a tank, and a pleasure to use. But at 740g it’s not something I’d haul up a mountain unless coffee was the whole point of the trip.
- Weight: ~740g
- Pros: Unbeatable grind quality, bombproof build, joy to use.
- Cons: Very heavy for backpacking, not the fastest.
- Best For: Basecamps, car camping, or trips where coffee is the main event.
Compact Travel Grinders
There are smaller hand grinders designed with backpackers in mind, like the Porlex Mini (~250g) or the Hario Mini Mill Plus (~300g). They’re far lighter and still produce a respectable grind. The trade-off is smaller capacity and a bit more effort per cup.
- Weight: 250–400g
- Pros: Light enough for backpacking, consistent grind, compact size.
- Cons: Slower, smaller capacity (one cup at a time).
- Best For: Solo trips or lightweight hikers who want the upgrade of fresh beans without going full barista.
Battery-Powered Grinders
At the luxury end are compact, battery-powered grinders. They save the arm workout and produce a decent grind, but they’re heavier, prone to failure in the wild, and of course dependent on a charged battery.
- Weight: 600–900g
- Pros: Fast, easy, consistent grind, fun gadget factor.
- Cons: Heavy, fragile, dependent on batteries, not very “wild-friendly.”
- Best For: Car camping, campervans, or glamping scenarios.
Pre-Ground Beans (The Pragmatic Shortcut)
Not exactly grinding outdoors, but worth mentioning: grinding beans at home just before a trip and storing them in an airtight container is often the sweet spot between flavour and practicality. Vacuum-sealed containers or even a sturdy Ziploc can keep beans fresh for a few days.
- Weight: Just the beans (20–30g per cup)
- Pros: No grinder required, fresh enough for short trips, simplest solution.
- Cons: Loses aromatics after a few days, not as fresh as grinding on the hill.
- Best For: Weekend hikes or when you want good coffee without extra kit.
A Note on Coffee Grounds and Leave No Trace
It can be tempting to scatter used coffee grounds in the heather or along a riverbank, but grounds don’t magically vanish. They’re organic, yes, but they take time to break down and in the meantime can attract wildlife, alter soil chemistry, and spoil the sense of wildness for the next person who comes along. The right thing to do is pack them out with you, just as you would any other waste. A small ziplock or compostable bag does the trick, and you can compost them properly once you’re home. That way you get the best of both worlds: great coffee in the wild, and a clean campsite left behind.
See also GearLab’s picks of the 9 best camp coffee makers.
Not into coffee? Then you may enjoy my post about tea in nature.
 A North Assynt Traverse from Foinaven To Quinag
Leave a Reply